10.16.2012

CONFETTI LEGGINGS tutorial

I am always admiring the hand-printed leggings on etsy and floating around Pinterest kid's style boards. While I am definitely not able to drop $30 and $40 on a pair of leggings for my stylish little gal (although I wish I was!), I do have a steady hand and my craft store has plenty of fabric paint. After repurposing a few of my old solid-colored pairs of leggings into new pint-sized leggings for the gal, I knew there had to be something to do to jazz them up a bit. Three different patterns popped into my head and after going through my acrylic paint stash, picking up some fabric paint and textile medium, and staying up way later than I should, I now have 3 uber stylish pairs of toddler leggings.

For my first pair of leggings, I was envisioning a confetti effect, so I started with my berry colored leggings and chose party colors like aqua, neon pink, yellow, and tangerine. I think metallics would also look awesome for this confetti pattern. If you don't have any solid-colored leggings for your kiddo sitting around already and aren't up to sewing any, they are cheap enough to buy at Target or Walmart.


WHAT YOU'LL NEED:
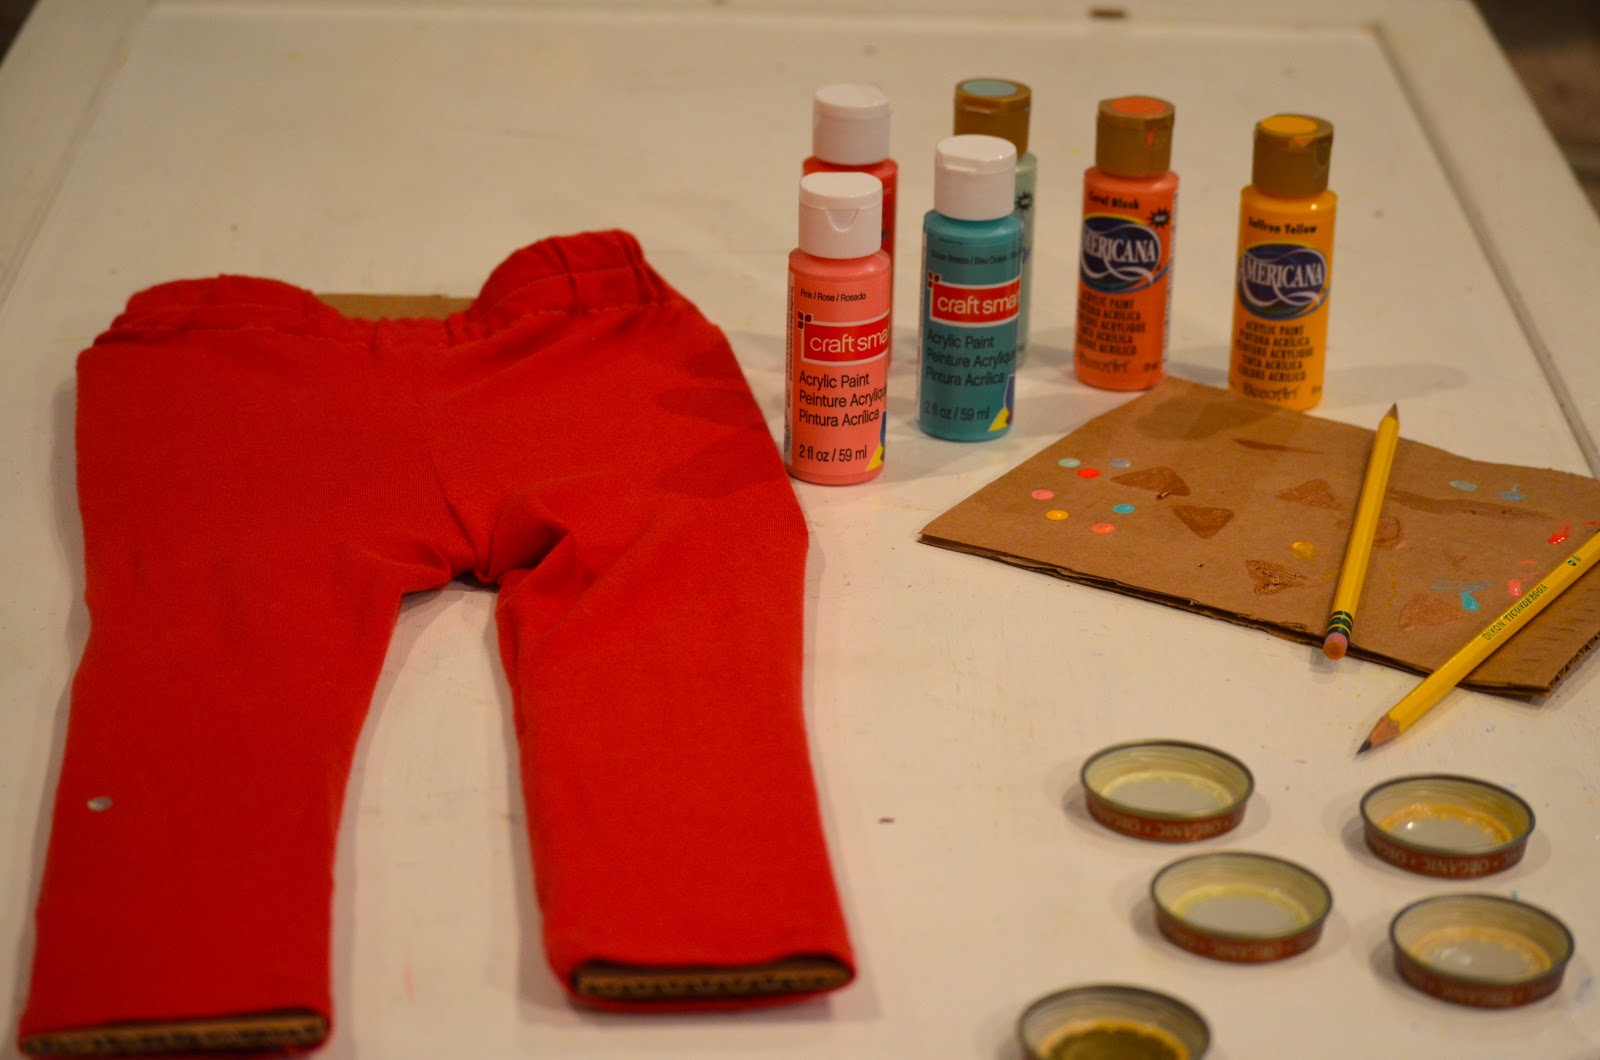
-Solid colored leggings
-Fabric paint or textile medium and acrylic paints
-A pencil with an unused eraser
-Small dishes for your paint (bottle caps or baby food jar lids work great!)
-Paper towel or cloth
-Cardboard
-Your favorite movie, show, or audiobook to enjoy

1.) Cut your cardboard in the shape of the leggings and stick it inside to keep the front and back from sticking together as you paint.


2.) If you are using a textile medium and acrylic paints, follow the directions on the back of your textile medium and mix the two in your dishes. If you are using fabric paint, squirt a little in your dishes. You only need about a teaspoon.

3.) Get your pencil and dip the very end of the eraser into your first color of paint. If you are nervous about stamping. You can practice a couple times on a piece of paper to make sure you are applying enough even pressure.

4.) Stamp one dot, then dip again, and repeat. To achieve the confetti look, I picked 2 areas to make the dots more concentrated and then stamped less dots in other areas. I stamped each color 3 or 4 times in the concentrated areas and then 3 or 4 dots spaced out over the rest of the area.

5.) Once you are done with the first color, wipe off your eraser with the paper towel and repeat with your next color. Repeat the process again until you are done with each color. If the colors aren't as saturated as you would like, you can restamp them once the dots dry a little until they are the saturation you desire.

6.) Swat the fly swarming around your face. That's just me? Oh ok. Continue on then.

7.) At this point you will only be done with one side. If you aren't in a rush to finish, you can simply let that side dry for a day and stamp the other side the next day. If you are impatient to finish (like me) you can lightly blow-dry the dots until they feel like they won't smudge when you turn over the leggings. Make sure you have paper towels or something covering your table when you flip the leggings over in case any paint comes off.

8.) Once you are done painting, let the leggings dry for 24 hours before setting with heat. Your fabric paint or textile medium should have instructions on how to set the paint with heat. Also note the washing instructions on your paint, so you don't wash them too soon if they need a few days to set.

9.) Now put the leggings on your tot and admire your handiwork!

10.15.2012

KCWC DAY 4 & 5: upcycled hand-printed leggings

The Kids Clothes Week Challenge is officially over, but I still have a few projects left to share with you, you lucky ducks.

A messy little toddler can never have too many leggings. When I was going through my closet to find clothes to upcycle for the kiddos, I found my collection of leggings from back when leggings were just coming in again. Three years ago I asked for 5 different colors of leggings for Christmas, and I got them all... and ended up wearing maybe 2 pairs. I was a little over-enthusiatic about the leggings trend. When I found them again, I immediately knew that #1- my leggings needed to go far away from my legs, and #2- where they needed to go was the kook's little legs. I used the same method as this tutorial to upcycle the leggings except I resized the legs to be thinner for little toddler legs by measuring against a pair of leggings that fit her well. Our legs aren't quite the same size. Oh, but I barely had to take the white pair of leggings in at all. And that was when I remembered I never wore them because they were so stinking tight. Toddler tight.

After I was done making the leggings, I decided they needed a little help and I got out the fabric paint and ended up with 3 funky hand-printed patterns on them that I love. I'll be sharing the tutorials with you this week.


Kook!

10.12.2012

A DAY at the PUMPKIN PATCH


Today I took a break from sewing and hubby took a break from work to head to a little pumpkin patch with Nana and Papa. There was lots of climbing on hay bales, sitting on pumpkins, tripping over irrigation hoses or whatever they might be called, riding in wagons, hay butts, and photo ops--- including one where hubby precariously stuck our 7 month old son on top of a pumpkin and I nearly had a heart attack.... but took a photo before collapsing out of fear, of course. They had a haunted house there so we sent Papa through to check it out. I got to the door and totally wimped out when I saw how dark it was. He came out with a bumped nose. Apparently it wasn't made for 6'2" big kids. It was a lovely afternoon and we came away with a few little pumpkins to decorate with. With my boots on, a scarf around my neck, and pumpkins in my house, I can officially declare it fall!

10.11.2012

KCWC DAY 3: upcycled sweater leggings

Okay, I'm a total cheater. I actually made these on Tuesday, the million hour day of sewing. I stayed up till the wee hours of the morning because I was so stoked that the blouse turned out and I wanted to keep sewing. I sewed the blouse, eyeballed a sweater dress that turned into a disaster (I'll do a KCWC outtakes post to share my absolute sewing fails when this week is over), and made these leggings. I was partying hard. Babies asleep, Boy Meets World on the TV (I own the whole series. Don't be jealous.), a pile of clothes to upcycle. Ohhhh yeeeeeah. Anyway, the cheating is now coming into play as it is Wednesday night as I write this and I am fried after a long evening of sewing on Tuesday and a day of crazy kids and grocery shopping. I am just hoping that when I roll off this couch, I miraculously land in bed instead of trapped in between the couch and the coffee table. But, I digress... let's discuss these leggings.

I started with this American Eagle sweater from back in my American Eagle days (Did anyone else have American Eagle days? I am so not an AE girl, but lost my sense of personal fashion one year of college and turned into an AE undergrad clone. Oh, college...). I didn't go off of a tutorial because it was pretty easy to figure out, but this tutorial is the exact process I used. And that's that! It was super easy to do and I love that the kook will have some really thick and warm sweater leggings to live in during the winter. She had a pair of sweater leggings from H&M last year and wore them all the time. So cute. I'm definitely going to try to find some sweaters at the thrift store to make her more.


On a totally unrelated but equally exciting note, I currently have the cotton ball end of a Q-tip stuck in my ear. Darn you, cheap Q-tips. It just popped off in there and I must have twisted it in really good before realizing what happened. So wish me luck with my cotton ball extraction. Um, yeah... I don't feel stupid at all. I think I'll go ahead and shove a pea up my nose too. Might as well, right? Hubby said I'm a cotton headed ninny muggins. He's called me that before, but tonight... I really am.

10.10.2012

KCWC DAY 2: upcycled blouse


On Tuesday I spent a million years sewing. Maybe not a million years, but it felt like it. I started with this Target blouse that I only wore a couple times because it just wasn't that flattering on me, and decided I'd try to upcycle it into a kook sized blouse. I spent the entire naptime measuring and tracing and cutting, and then noticed I cut it totally crooked. Not crooked shmooked crooked, but seriously crooked. So then I had to go back and cut the pieces straight, but that meant cutting a bunch off one side which meant that the blouse was now too narrow around the midsection. To remedy that I cut triangles along the side seams of the mama blouse to add extra material to the sides of the toddler blouse. I was totally flying by the seat of my pants there (I don't know where that expression comes from either). I pinned it all together and it worked to widen the midsection and it actually looked kind of cute- as cute as an inside out pinned together blouse can look. And then the kids woke up and I frantically picked up pins and scissors so I wouldn't have an Adelaide scissor/pin-hands walking around.

After the kook went to bed I started my sewing and was pretty crazy happy when it all came together to make a cute little blouse. A fly by the seat of my pants upcycled sewing success!

Don't you love her poof of hair? Her hair is growing SO SLOW and it's growing up or out. I wonder how big her fro will be before it's finally heavy enough to fall down to her shoulders. As you can see, she was totally giddy to go outside and take these photos. But giddy or peeved to be stuck standing in one spot, she's still a cutie in her new blouse!

KCWC DAY 1: loungies


This week I'm participating in the Kids Clothes Week Challenge hosted by Elsie Marley. Besides some matching pjs for my stuffed orangutan Punky Ponzo and I in elementary school, I have never sewn clothes for myself or the mini me's. I started sewing this last year to make some plush toys for the kook and her cousins and am pretty much just teaching myself as I go along. My mom taught my sister and I when we were young so I have some basic and very, very rusty skills, but beyond that, I'm learning by trial and error.

I followed Carla at Small and Friendly's projects through KCWC last year but had no motivation to sew anything besides softies and decorations. This year I had just purged my closet when I saw that KCWC was coming up in a few weeks. I happen to be needing some sweats and basic pieces for the kids' fall/winter wardrobes so I figure there's nothing to lose (besides my sanity) with just trying. If you want to participate, it's not too late. You've only missed a couple days and I'm pretty sure Elsie doesn't have any KCWC cops to come take your sewing machine away.


For day 1 I decided to start on a pair of sweats for the little man. I love this DIY for Low 'n' Lazy Loungies from Sophie of Cirque du Bebe so I gathered up a pair of long sweat shorts I had in my repurpose pile and went to work cutting out one side. As soon as I tried to starting cutting pieces for the other side, I realized a big ugly embroidery piece (the reason the shorts were in the repurpose pile) was in the way and there was no way for me to have enough material for both sides. Oops. Trial and error, I tell you. So I grabbed another pair of sweats in a coordinating color and cut a side out from them. In Sophie's DIY, she had a cute huge pocket on the front of the Loungies because the sweatshirt she repurposed had a pocket. I didn't have a pocket to repurpose but loved it enough to try and make my own. It isn't as big as I would like and I made it a bit low, but I still like it. Instead of sewing a waistband from scratch, I just used the waistband from my sweat shorts.


All in all, the Loungies fit well and will be great for fall weather. I hope to find some funky sweatshirt fabric like Sophie's to make some more for the little man and some for the kook.... and some for hubby... and some for me. C'mon, don't they look comfy? I think hubby might protest. He's not really a drop-crotch kinda guy. And really, anyone that is a drop-crotch kinda guy is very... special.

(If you'd like to see some of the other projects I'm dreaming of sewing up. Check out my KCWC board on Pinterest.)

Link Within

Blog Widget by LinkWithin