10.18.2012

KCWC outtakes

This is what happens when you take a sweater and say "I can totally make this into a toddler sweater dress" without measuring anything. The neckline didn't look that big to me and somewhere in my brain I thought "Hey, this neck hole looks like it'd fit her" because she and I totally have the same size neck??! Yeah... I don't know. It was on an evening when I'd tackled a few projects already so it was probably 1 or 2am and I wanted to whip out one more thing fast. Fast as in not doing any prep. A snip here, a snip there, no snips at the neckline... and this is what I ended up with. I tried it on the kook the next day and burst out laughing. And that was the day I learned I can never eyeball a pattern. I definitely need something to trace or measure against. The kook thought it was funny too. I have plans to cut this ridiculous dress up to make a sweater jumper most likely. Maybe I'll try it at 9pm with correct measurements next time. Sheesh...


And here's a mid-KCWC jig for you to enjoy. 


10.17.2012

BOW LEGGINGS tutorial

For my second pair of hand-stamped leggings during KCWC, I chose to do a bow design. I've seen several bow print shirts, sweaters, and more and am all about bows and polka-dots for the gal right now. Okay, really any fun prints... And now that I've gotten into hand-stamping prints on fabric, I can make any printed clothes my print-loving heart desires. You can too! But let's start with these bow leggings.

WHAT YOU'LL NEED:
-Solid colored leggings
-Fabric paint or acrylic paint plus textile medium
-2 medium-sized potatoes
-A sharp knife
-Cardboard
-A small plate for your paint
-The next episode of your favorite show

1.) Cut your cardboard in the shape of your leggings and stick it inside.

2.) Take your knife and one potato, and cut a bow design into the potato about 1/2" deep. Then use your knife to cut around the design on the side, so that all you have left is bow potato stamp.

3.) Take your knife and the second potato, and cut a circle just big enough to be the center for your bow. Then use your knife to cut around the design but not into it, so that all you have left is a circle potato stamp.

 3.) If you are using acrylic paint plus textile medium, follow the directions on the back of your textile medium and mix the two together on your plate. If you are using fabric paint, just squirt some on the plate. I covered my dish with enough paint to be just a bit bigger than I wanted my bow. A thin pool of paint is better than thick.

 4.) Take your bow potato stamp and dip the very end of it into the paint. At this point, it is good to do a practice stamp or two on a piece of paper to make sure you are using the right amount of paint, not too much or too little, and the right amount of pressure.

 5.) Once you are confident in your stamping, you can start stamping bows on your leggings. Dip your potato in the paint in between each time you stamp. I didn't do very many bows on my leggings, but I think it would also look pretty awesome to have a ton of bows, so go crazy if your heart desires!

6.) Once you are done stamping bows, you can repeat the same process with your circle stamp and stamp circles into the middle of your bows.

7.) If the bow isn't as saturated with color as you would like, you can wait a little while and then carefully restamp them all until they are as saturated as you want.


8.) Once you are done painting, let the leggings dry for 24 hours and then set the paint with heat as directed on the back of your textile medium or fabric paint. Also note washing instructions on your paint, so you don't wash them sooner than needed.

9.) When you are done, and your paint is all dry and set, put the leggings on your toddler and take photos to share with all your blog and Facebook friends. You're so crafty!


10.16.2012

KCWC DAY 6 & 7: upcycled thermal nightgown & thermal tee fail

For days 6 and 7 of KCWC, I got out my pile of old thermals. First I cut the sleeves off of my gray one and blue one to make pants for the little man (which I haven't gotten to yet). Then I was left with a sleeveless thermal. I looked at the length and thought it might be the perfect length for a nightgown for the kook. I tried it on her in it's huge state and after she took a nap in it and played for a while, I made her take it off so I could actually take it in to fit a toddler. The length ended up being so perfect that I didn't have to touch the original hem. All I did was trace a slightly loose tee she has to get an idea of where to sew the top, and then extended it to dress length. I left the sleeves raw and took in the neckline to fit her, and that was that. Very simple and practical nightgown. When I was done sewing, I pulled out my fabric paints and spent way too long painting a little kitty friend for the kook. We're both happy with how it turned out. Soon I get to repeat the process with the rest of the blue thermal I chopped the sleeves off of. If anyone is interested, I can attempt a tutorial for you.

My next thermal project was pretending that I know how to sew a long-sleeved tee and learning that I don't. Time to invest in the Flashback Skinny Tee pattern by Made by Rae. I'm going to keep this tee around for her to play in and it may make it out of the house under a sweatshirt, but I definitely didn't mean to do a boatneck and dropped sleeves and my waist hem and pocket are pretty sad. Oh well. That's what happens when an over-confident beginning seamstress tries to make something without a pattern at 1am.

All in all, I'm happy with the sewing I accomplished during KCWC. It was my first time sewing clothing since a couple times in elementary school and I was able to pull only from my stash of clothes to repurpose which meant that I only spent a little bit of money on fabric paint and elastic. My list of things to buy for the kids' fall/winter wardrobes got cut in half and spending a week sewing has convinced me that I can probably make most of the other items they need on the list. Thanks to Elsie for hosting KCWC. I can't wait for the Spring one!

CONFETTI LEGGINGS tutorial

I am always admiring the hand-printed leggings on etsy and floating around Pinterest kid's style boards. While I am definitely not able to drop $30 and $40 on a pair of leggings for my stylish little gal (although I wish I was!), I do have a steady hand and my craft store has plenty of fabric paint. After repurposing a few of my old solid-colored pairs of leggings into new pint-sized leggings for the gal, I knew there had to be something to do to jazz them up a bit. Three different patterns popped into my head and after going through my acrylic paint stash, picking up some fabric paint and textile medium, and staying up way later than I should, I now have 3 uber stylish pairs of toddler leggings.

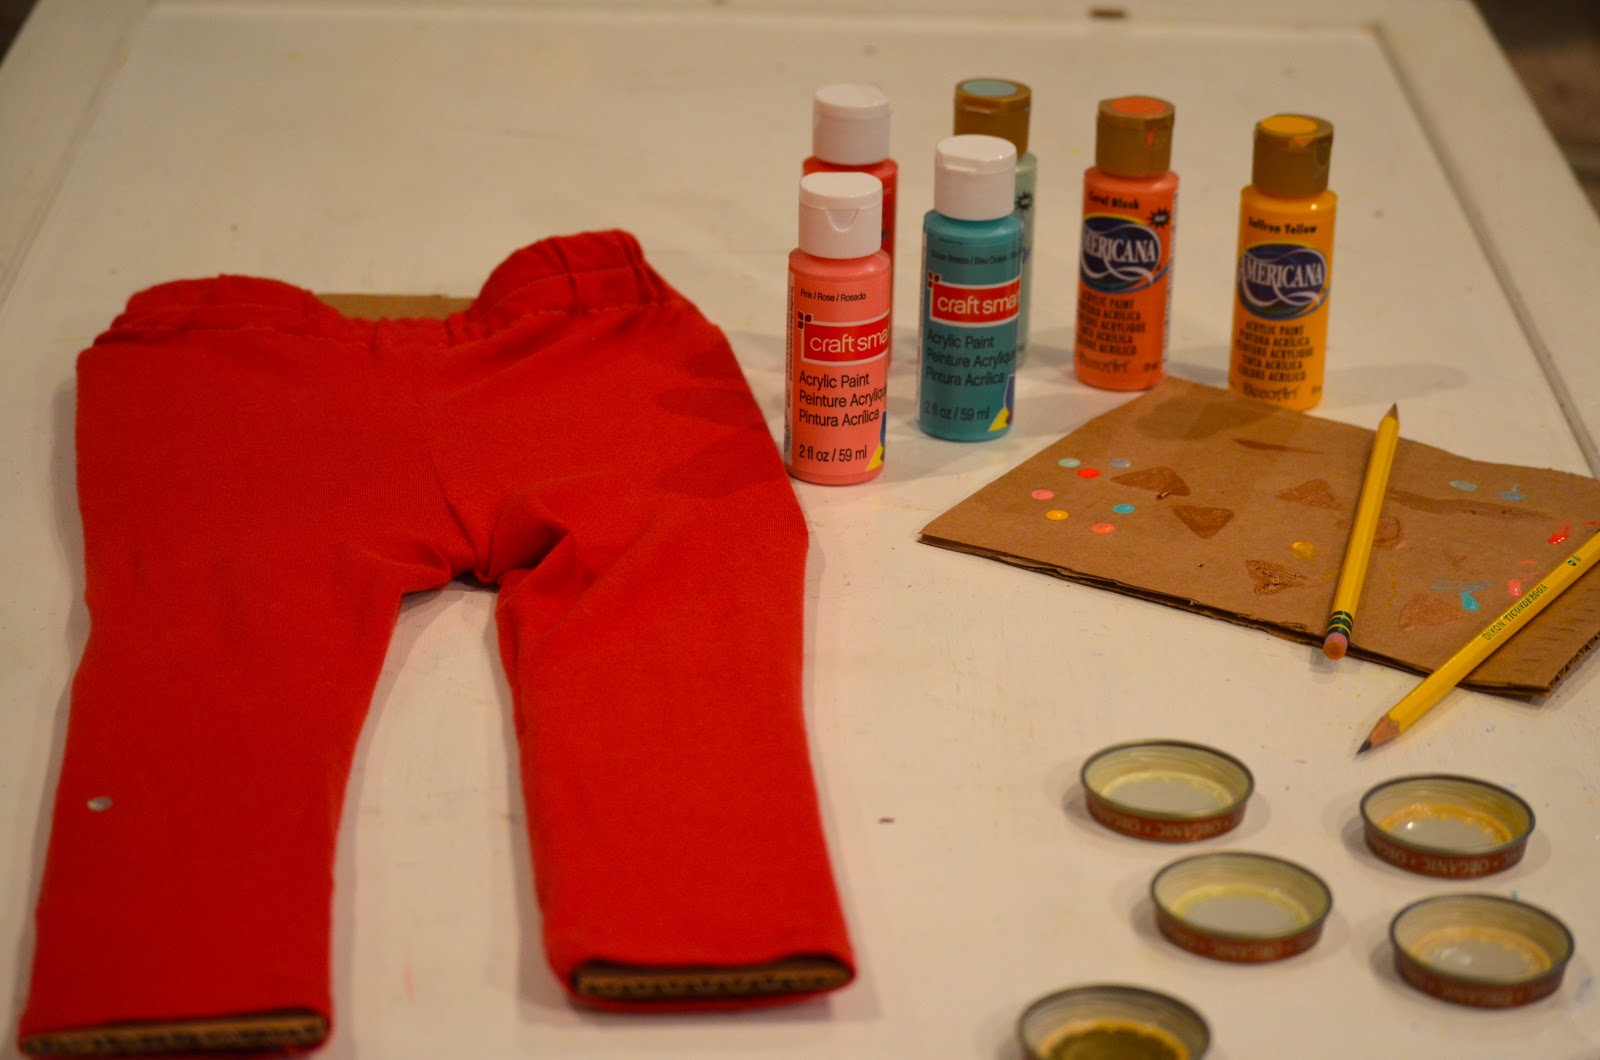
For my first pair of leggings, I was envisioning a confetti effect, so I started with my berry colored leggings and chose party colors like aqua, neon pink, yellow, and tangerine. I think metallics would also look awesome for this confetti pattern. If you don't have any solid-colored leggings for your kiddo sitting around already and aren't up to sewing any, they are cheap enough to buy at Target or Walmart.


WHAT YOU'LL NEED:
-Solid colored leggings
-Fabric paint or textile medium and acrylic paints
-A pencil with an unused eraser
-Small dishes for your paint (bottle caps or baby food jar lids work great!)
-Paper towel or cloth
-Cardboard
-Your favorite movie, show, or audiobook to enjoy

1.) Cut your cardboard in the shape of the leggings and stick it inside to keep the front and back from sticking together as you paint.


2.) If you are using a textile medium and acrylic paints, follow the directions on the back of your textile medium and mix the two in your dishes. If you are using fabric paint, squirt a little in your dishes. You only need about a teaspoon.

3.) Get your pencil and dip the very end of the eraser into your first color of paint. If you are nervous about stamping. You can practice a couple times on a piece of paper to make sure you are applying enough even pressure.

4.) Stamp one dot, then dip again, and repeat. To achieve the confetti look, I picked 2 areas to make the dots more concentrated and then stamped less dots in other areas. I stamped each color 3 or 4 times in the concentrated areas and then 3 or 4 dots spaced out over the rest of the area.

5.) Once you are done with the first color, wipe off your eraser with the paper towel and repeat with your next color. Repeat the process again until you are done with each color. If the colors aren't as saturated as you would like, you can restamp them once the dots dry a little until they are the saturation you desire.

6.) Swat the fly swarming around your face. That's just me? Oh ok. Continue on then.

7.) At this point you will only be done with one side. If you aren't in a rush to finish, you can simply let that side dry for a day and stamp the other side the next day. If you are impatient to finish (like me) you can lightly blow-dry the dots until they feel like they won't smudge when you turn over the leggings. Make sure you have paper towels or something covering your table when you flip the leggings over in case any paint comes off.

8.) Once you are done painting, let the leggings dry for 24 hours before setting with heat. Your fabric paint or textile medium should have instructions on how to set the paint with heat. Also note the washing instructions on your paint, so you don't wash them too soon if they need a few days to set.

9.) Now put the leggings on your tot and admire your handiwork!

10.15.2012

KCWC DAY 4 & 5: upcycled hand-printed leggings

The Kids Clothes Week Challenge is officially over, but I still have a few projects left to share with you, you lucky ducks.

A messy little toddler can never have too many leggings. When I was going through my closet to find clothes to upcycle for the kiddos, I found my collection of leggings from back when leggings were just coming in again. Three years ago I asked for 5 different colors of leggings for Christmas, and I got them all... and ended up wearing maybe 2 pairs. I was a little over-enthusiatic about the leggings trend. When I found them again, I immediately knew that #1- my leggings needed to go far away from my legs, and #2- where they needed to go was the kook's little legs. I used the same method as this tutorial to upcycle the leggings except I resized the legs to be thinner for little toddler legs by measuring against a pair of leggings that fit her well. Our legs aren't quite the same size. Oh, but I barely had to take the white pair of leggings in at all. And that was when I remembered I never wore them because they were so stinking tight. Toddler tight.

After I was done making the leggings, I decided they needed a little help and I got out the fabric paint and ended up with 3 funky hand-printed patterns on them that I love. I'll be sharing the tutorials with you this week.


Kook!

10.12.2012

A DAY at the PUMPKIN PATCH


Today I took a break from sewing and hubby took a break from work to head to a little pumpkin patch with Nana and Papa. There was lots of climbing on hay bales, sitting on pumpkins, tripping over irrigation hoses or whatever they might be called, riding in wagons, hay butts, and photo ops--- including one where hubby precariously stuck our 7 month old son on top of a pumpkin and I nearly had a heart attack.... but took a photo before collapsing out of fear, of course. They had a haunted house there so we sent Papa through to check it out. I got to the door and totally wimped out when I saw how dark it was. He came out with a bumped nose. Apparently it wasn't made for 6'2" big kids. It was a lovely afternoon and we came away with a few little pumpkins to decorate with. With my boots on, a scarf around my neck, and pumpkins in my house, I can officially declare it fall!

Link Within

Blog Widget by LinkWithin